Product Updates
Most Recent Updates
Past Updates: 2021, 2020, 2019, 2018
June 2022 Updates
END USER UPDATES
New DocuSign Integration
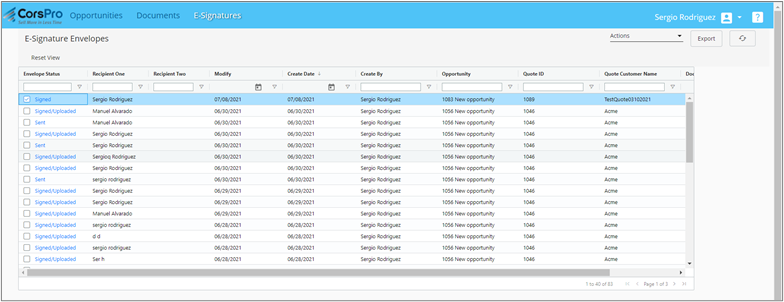
We’re excited to announce our new integration with DocuSign, giving our customers the ability to send, track, and manage their electronic signatures through our browser-based Dashboard. From proposals and SOWs to contracts and agreements, DocuSign eSignature is the world’s #1 way to send and e-sign from practically anywhere, at any time.
Our DocuSign Integration allows you to…
- Send, manage and track e-signatures in our browser-based Dashboard
- View the status of any document sent for e-signature
- Filter, sort and search for documents sent for e-signature by multiple factors
- Export data for custom reports
There are no additional monthly charges for integration for this service other than your DocuSign charges.
Contact your Admin to set up this integration!
New Dashboard Home Summary Page
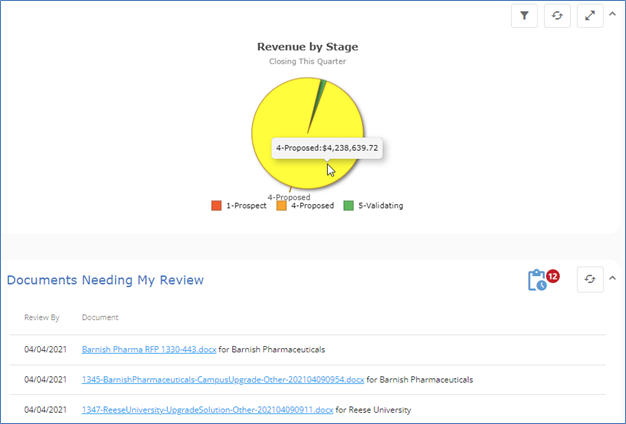
Take control of your opportunities, quotes and documents with our all-new Home Summary Page that summarizes data into convenient charts and lists.

Available charts and lists include:
- Opportunities by Stage
- Revenue by Stage
- Documents Requiring My Approval
- Documents Needing My Review
- Recent Opportunities
- New Opportunities
- Recent Documents
- Recent Quotes
- Closing This Month
- Largest Opportunities
- Latest E-Signatures
- Unsigned Documents
Click on the blue arrow (A in the screenshot below) in the upper left to expand out the configuration menu, which allows you to select which charts and lists to include and move them around via drag-and-drop. Make sure to click the Save button at the bottom once you’ve configured your charts and lists.
Click the caret (B in the screenshot above) in the upper right-hand corner of each chart/list block to expand or collapse a particular chart/list.
For most of the charts/lists, there’s a filter icon that allows you to fine-tune what you’d like to show or list. For example, you can filter it to show just YOUR opportunities, or you can show all opportunities that you’re allowed to see, even if they’re not your own.
You can turn on or off the Dashboard Home Summary Page by going to “My Profile” via the drop-down in the upper-right hand corner of any screen, then selecting “Yes” next to “Show home summary page.” Administrators can turn the page on or off for all users all at once by going to the Account Settings view within the Admin section of the Dashboard and selecting Yes or No next to “Show home summary page for users”.
New Recycle Bin
Have you ever deleted information in the Dashboard and wished that you could get it back? Now you can do that using the new Recycle Bin, accessible via your profile drop-down in the upper right-hand corner of any view. When you delete documents, quotes and opportunities, the data is logically deleted rather than physically deleted. The Recycle Bin enables you to restore the logically deleted data.
To use the Recycle Bin, choose the time frame of deleted data that you’d like to examine via the drop-down that defaults to “Most recent” (other options are the past 7, 30, 60 or 90 days). Next, check the box next to each deleted item – each of which is highlighted in red – that you’d like to undelete, then click on the Actions menu and select Undelete item(s). Administrators will also see a third menu that allows them to view deletions across all users.
Here’s a close-up of the drop-down menus in the Recycle Bin.
![]()
In below example, a quote document can be undeleted by checking the box on the left-hand side of the red-highlighted row for the document, then clicking Undelete item(s) under the Actions menu in the upper right.

ADMIN UPDATES
New DocuSign Integration
The DocuSign Integration allows users to send Word, Excel and PDF documents for e-signature via SalesDoc Architect at the desktop. Users can send an “envelope” with one or more documents to sign by selecting Files/Docs >> E-signatures >> Select file(s) to send for e-signature within SDA’s Excel or Word menu. You can also send the currently open Word document for e-signature by selecting Files/Docs >> E-signatures >> Send this file for e-signature within the Word tool’s menu.
If you manage your project files in SharePoint, or we host your project files for you (in AWS), you can also send documents for e-signature directly from the Documents view of the Dashboard.
There are no additional monthly charges for integration for this service other than your DocuSign charges.
To set up the DocuSign integration, you will need your DocuSign account information. Please refer to the DocuSign Integration Admin Guide for setup instructions.
New Dashboard Home Summary Page
Check out our end-user version of What’s New (via Add-ins >> Help >> What’s New >> For Users (from CorsPro) for more information on the new Dashboard Home Summary Page. Each user can turn on or off the Summary Home Page by going to “My Profile” via the drop-down in the upper-right hand corner of any screen, then selecting “Yes” next to “Show home summary page.” As an administrator, can you turn it on or off across all users all at once by going to the Account Settings view within the Admin section of the Dashboard and selecting Yes or No next to “Show home summary page for users”.
New Recycle Bin
Please refer to the end-user version of What’s New for more information on the new Recycle Bin, which allows users to undelete document, quote and opportunity data in the Dashboard. In addition, administrators can, if they wish, undelete data across all users by selecting “Deletions for all users” in the drop-down.
January 2022 Updates
END USER UPDATES
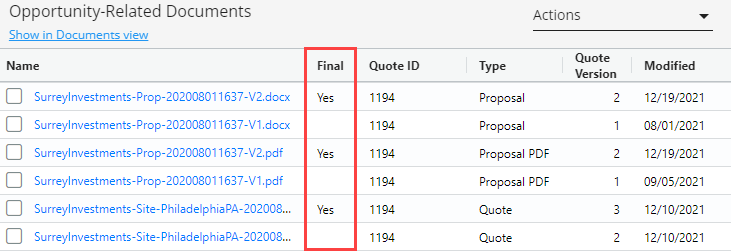
Do your order processing or operations teams have difficulty determining the “final version” documents for large projects? Now you can mark documents as final versions in the Dashboard.

You can mark documents as final by checking the selector box for the appropriate document(s), then selecting Mark as final version under the Actions menu. We’ve also added a Sort by File Type by Quote option under the Actions menu so that you can sort the view by Quote ID, File Type and last modified date (descending), which makes it easy to find and then mark the most recent document for each File Type.
The Mark as final version and Sort by File Type by Quote actions are available in the Documents view as well as in the Opportunity and Quote pop-outs of the Opportunities view, accessible by clicking the Opportunity ID or the Quote ID within an opportunity.
Once documents have been marked as “final”, your order processing or operations teams can easily filter the Documents view to show only final version documents by selecting Yes in the filter box for the Final column.

New Actions Menu Items in the Opportunities View
We’ve added a few new items to the Actions menu in the Opportunities view of the Dashboard, including…
- Update Stage, which allows you to select one or more opportunities, then update the sales stage. When you update the sales stage, the default close probability will be auto-populated, which you can then change as you wish.
- Reassign Opportunity(s), which allows you to reassign one or more opportunities to another owner, which is especially useful when salespeople leave your organization.
New File Link Right-Click Options
You can now right-click on any file link within the Dashboard to reveal options to either OPEN or DOWNLOAD the file. The file link right-click option is available in the Documents view as well as in the Opportunity and Quote pop-outs of the Opportunities view.
ADMINISTRATOR UPDATES
New Outputs Debug Mode
Generate Doc from Outline (debug mode) has been added as an output option, accessible in the desktop menu system via Help => Support Functions. This function enables admins to test and debug doc sections in the SDA Library and/or RFP Response Builder Library, along with seeing the variables that exist within any doc section.
To use this functionality…
- Insert any “outline” tab containing a DocContent named range (see “Outline-Driven Content” below for more information). If you don’t have an outline-based tab, please contact support@corspro.com so that we can send one to you.
- Use Insert => Doc Section to insert the doc sections you’d like to debug.
- Generate the output via Help => Support Functions => Generate Doc from Outline (debug mode).
Did you know that you can see all of the SDA doc sections included in any particular output in a file called output.csv that’s located in your C:\CorsPro\PropGen\Data_[UserName] folder? First, generate the output that you’re trying to debug so that the output.csv file is generated. Next, open up the output.csv file and insert into the outline tab the doc sections listed in the output.csv file; you’ll see the doc sections listed at the top of the output.csv file where it says “Section” in column A. Finally, run the Generate Doc from Outline (debug mode) menu option.

