DocuSign Integration Admin Guide
Overview of CorsPro’s DocuSign Integration
The DocuSign Integration allows users to send Word, Excel and PDF documents for e-signature via the CorsPro application (hereafter referred to as “the application”). Users can send an “envelope” with multiple documents to sign by selecting Files/Docs >> E-signatures >> Select file(s) to send for e-signature within the application’s Excel or Word menu, or you can send the currently open Word document for e-signature by selecting Files/Docs >> E-signatures >> Send this file for e-signature within the Word tool’s menu.
It is important to mention that the DocuSign integration creates signing controls in each document for the recipients to e-sign based on text tags that are inserted into the document. The key text tags are SignHere_1 and SignHere_2, allowing one or two recipients to sign a document. DocuSign creates the signing control in front of these text tags, so you should make the font color of the text tag the same as the document background color, generally white.
See also The DocuSign Integration User Guide as it contains important user instructions.
Initial Setup
DocuSign Account
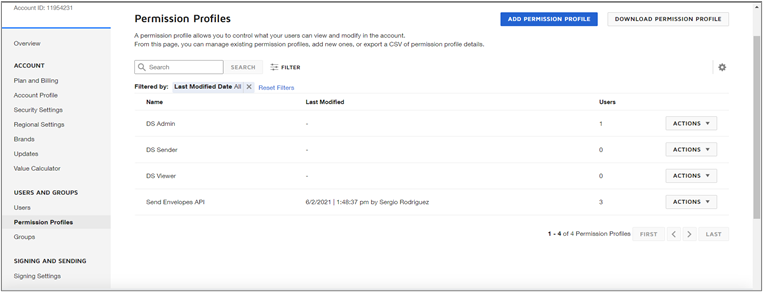
To use DocuSign from the Dashboard, the users must have certain permissions to create the envelopes and use the DocuSign API. To do this we recommend going to your DocuSign account and creating a new profile and assign it to the users in the organization.
Users must be granted the following permissions within your organization’s DocuSign account…
- Allow users to send envelopes.
- Allow template creation.
- Allow signer attachments.
- Allow recipient viewed notifications.
- Allow view and manage envelope rights through API.
- Allow send on behalf of other users through API.
Dashboard Setup
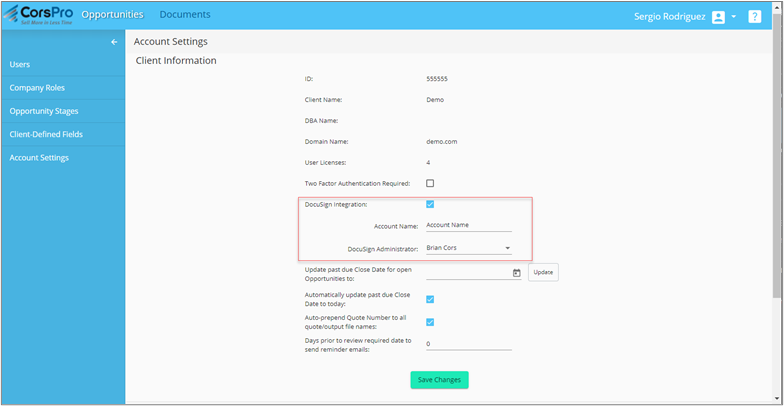
In the Dashboard, the admin must specify the precise name of the DocuSign account to use and the DocuSign admin user the Dashboard will use when we make any DocuSign requests from the Dashboard such as resending an envelope. In the Dashboard, the admin goes to the Account Settings page within the Admin portion and enables “DocuSign Integration” and enters the required information. NOTE: the DocuSign account name can be found within the DocuSign application by going to My Preferences >> Settings >> Account Profile.
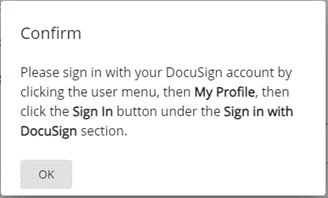
After the account/company-level changes are saved, the admin will get the message above and should then be able to see the E-Signatures tab in the Dashboard. If the admin cannot see it, then the admin should log in again in the Dashboard. Once the account/company-level setup is finished, the next step is for the administrator to sign in with DocuSign at the user level by going to “My Profile” in the Dashboard, then clicking the Sign In button under the “Sign in with DocuSign” section. This will take the (admin) user to a DocuSign page which grants permission to the CorsPro integration so that it can send envelopes for signing on the user’s behalf.
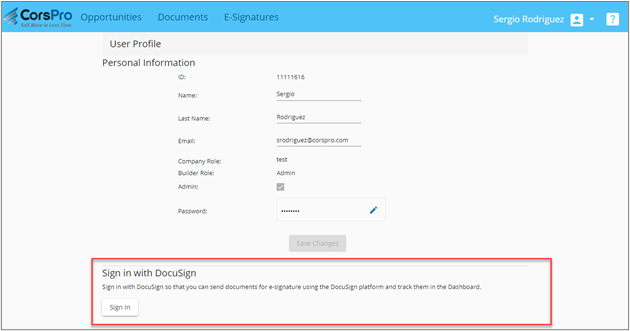
Once the Sign In button is clicked, the user needs to log into their DocuSign account and give permission to the CorsPro Integration to act on their behalf.
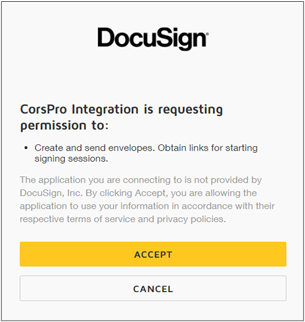
In addition to the administrator, each user who will be sending documents for e-signature will need to go through the “Sign in with DocuSign” process via “My Profile”.
SDA Setup
Once the Dashboard setup process is complete, the user needs to enable the DocuSign integration at the Desktop by closing Excel and Word, then opening the application in Excel and running Add-ins >> Help >> Support functions >> Re-initialize Desktop so that the DocuSign information is synchronized to the Desktop, and so that the menu systems in the Excel and Word tools can be regenerated to include the E-Signatures sub-menu.
Prepare Documents for E-Signature
Before a file can be sent for e-signature, signature and other text tags need to be added in the Word or Excel file with a font color that matches the background (generally white) so that the tags are not visible to the reader. The following text tags can be added to Word or Excel files that will be sent for e-signature:
- SignHere_1: a control will be inserted on top of this text tag that enables the recipient to e-sign the document. This tag is REQUIRED.
- SignFullName_1: a control will be inserted on top of this text tag that prompts the recipient to type in their full signature name.
- SignTitle_1: a control will be inserted on top of this text tag that prompts the recipient to type in their job title.
- SignDate_1: a control will be inserted on top of this text tag that inserts the date/time of the e-signature.
If you wish for a document to be signed by a second recipient as well, you can also insert SignHere_2, SignTitle_2, SignFullName_2 and SignDate_2 as text tags.
You can also send PDF files for e-signature. The appropriate text tags must be inserted into the “raw” Word or Excel document before the document is converted to PDF.
Send Files to Sign from the Desktop
To send files for e-signature via Excel or Word at the Desktop, click Add-ins >> E-Signatures >> Select file(s) to send for e-signature. This will show the “Dashboard Documents Manager” window where users can select the documents to send for e-signature. Documents can be multi-selected by holding the Control or Shift keys while selecting the documents.
Requirements and validations:
- The selected documents must be associated with the same Quote.
- Users can select .doc, .docx, .xls, .xlsx and/or PDF files.
- The selected documents must contain the SignHere_1 text tag at a minimum.
Once the documents have been selected, click the Send to Sign button.
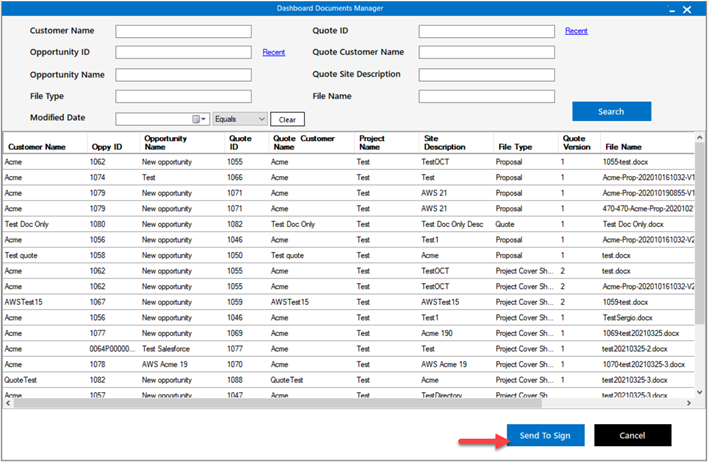
After clicking Send to Sign, the application will show the “Envelope Information” dialog (see below).
Send Current File to Sign
With the document opened in Word, click Add-ins >> Files/Docs >> E-signatures >> Send this file for e-signature.
After this, the system will show you to the “Envelope Information” dialog (see below).
Envelope Information
The “Envelope Information” dialog shows the list of documents that were selected for e-signature and allows the user to specify the recipients of the e-signature envelope as well as the email subject. If any of the selected documents do not contain the SignHere_1 text tag – which is required – then the dialog will display the following error “Error: The red-highlighted documents lack signature tags”. The information for the second recipient (SignHere_2) is optional.
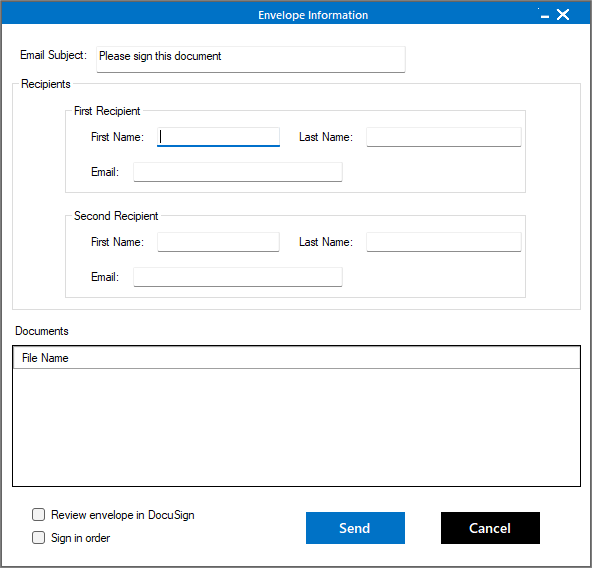
The user can also optionally:
- Click the Review envelope in DocuSign checkbox to use DocuSign’s console to modify and further customize the envelope.
- Click the Sign in order checkbox to send the envelope for e-signature to the second recipient AFTER the first recipient has e-signed the documents within the envelope.
After entering the required information, click Send. This process sends the envelope and related documents to DocuSign, which in turn generates an email to the designated recipient(s) so that they can e-sign the documents within the envelope.
Send Files to Sign from the Dashboard
You can also send files for e-signature via the browser-accessed Dashboard. To send one or more documents (as part of a single envelope), select the documents from the Documents view, then click Send File(s) for E-Signature under the Actions menu.
Requirements and validations:
- Only available for files stored in SharePoint and AWS (hosted by CorsPro). For SharePoint, your admin must enable the SharePoint/Dashboard integration, and each user must sign into SharePoint via their Dashboard User Profile.
- The selected documents must be associated with the same Quote.
- Users can select .docx, .xlsx and/or PDF files.
- The selected documents must contain signature reserved words (SignHere_1 and/or SignHere_2), with SignHere_1 required at a minimum (SignHere_2 is optional).
After the user clicks the Send File(s) for E-Signature button, the application checks for the existence of the reserved words and then shows the Envelope Information pop-up, where the user enters the recipient(s) information.
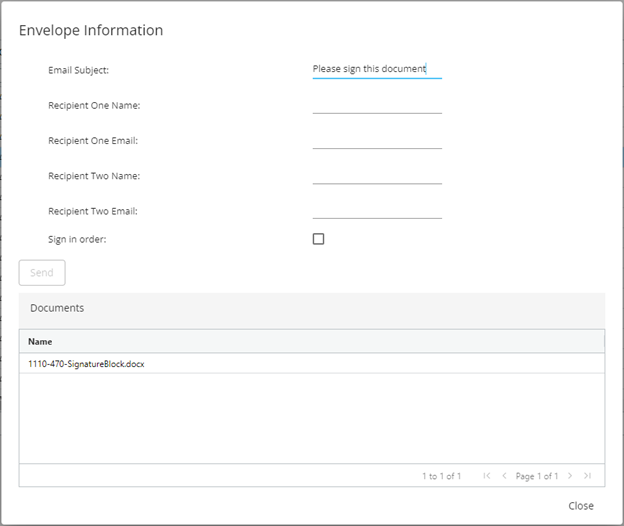
After the Send button is clicked, the application redirects the user to the DocuSign’s Console to modify and further customize the envelope, although in most cases the user will simply need to click Send.
Retrieve Signed Documents
After the recipients have signed the documents, the application will automatically try to obtain the signed PDF files from DocuSign, then upload them to the same shared file location as the original document that was sent for e-signature. This process runs every 12 hours for signed documents belonging to the user, or every hour for machines designated as an “auto-download” machine. The auto-download machine will attempt to download (and then upload) signed PDFs belonging to ALL users, subject to the permissions established by the Company Roles setup in the Admin portion of the Dashboard. Machines must be running in order to retrieve signed documents.
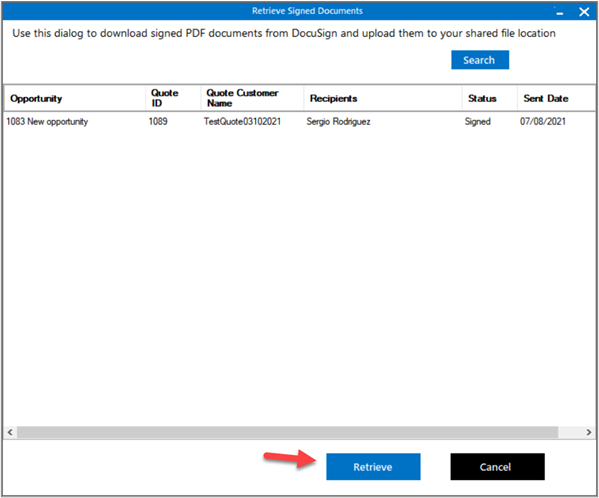
Users can also “manually” (and immediately) download signed PDFs by selecting Add-ins >> Files/Docs >> E-Signatures >> Retrieve signed PDFs from DocuSign, which pops up a “Retrieve Signed Documents” dialog where the user can see the envelopes that are already signed and can be downloaded and then uploaded to the shared file location.
E-Signatures Dashboard View
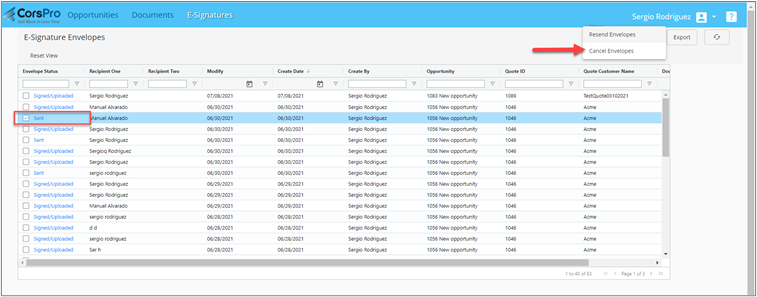
The “E-Signatures” view in the Dashboard shows all the envelopes that have been sent for e-signature.
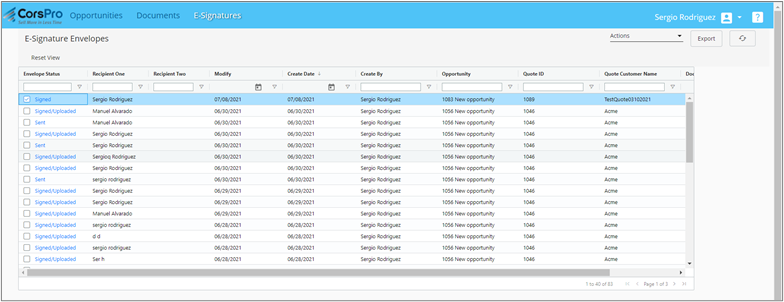
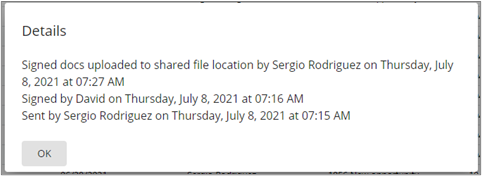
To see the envelope history, you can click on the hyperlink in the Envelope Status column and it will show a detailed history of the envelope.
Resend Envelope
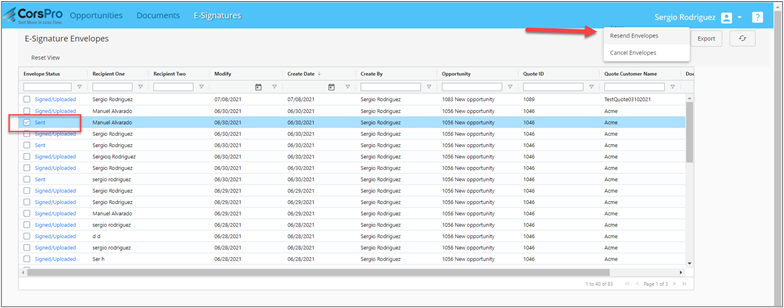
In case the envelope recipients did not receive or lost the email, you can always resend the envelope via the Dashboard. In the “E-Signatures” view, select the envelope(s) then select the Resend Envelopes option under the Actions menu. You can only resend envelopes with a “Sent” status.
Cancel Envelopes
The Dashboard also provides the option to cancel an envelope. This means the recipients cannot sign the documents anymore because the envelope is no longer available. This option is only available for envelopes with a “Sent” status.
