Manufacturer Labor & SOW Tab Guide for Administrators
Overview
We have developed two templates using the application-based approach to configuring labor: the Mitel Labor & SOW Tab and the NEC Labor & SOW Tab. These tabs can also be modified to fit any solution including security solutions, healthcare solutions, etc. Not only do these tabs calculate estimated labor, but they also use an outline-driven approach for assembling statement of work (SOW) content. By answering questions or entering quantities on the outline rows within the tabs, labor estimates are calculated and SOW content is generated simultaneously. This guide will step you through how to set up the tab(s) and implement them in your SDA environment.
More Accurate Labor and Better Margins
These tabs are intended to replace the outdated way of configuring labor. The old approach calculated labor based on part number. Today, parts are not necessarily indicative of the time spent installing and designing them but rather the overall application. This new, more accurate approach to calculating labor based on the applications/tasks results in:
- More accurate labor pricing
- Better Margins with more accurate SOWs
- Easier to modify calculations
- A more visual representation of labor for the Operations team
Advanced Functionality You can See
Another huge benefit to the functionality in these tabs is that by answering questions and populating quantities on the outline rows, the tab is both figuring the labor and providing great content for your SOWs and proposal documents. Better statements of work help you retain and improve your margins, set better expectations with your customers, and protect your bottom line.
Customization Overview
- Download the file(s) and copy it to your CorsPro folder under PQuote\Tabs:
- Test it out right away by opening a new quote file, inserting the tab into a live quote file, entering some quantities and then generating an output via Outputs >> Generate Document from Outline.
- Open the raw file from c:\CorsPro\PQuote\Tabs to customize it for your business:
- Modify the labor for each item in the Hours/Qty Column (column K)
- Customize content and formulas in the rows and columns for your business
- Add additional content:
- Go to Add-ins >> Insert >> Doc Section
- Add PDFs, Bullets, Sub-Bullets, and Headers as needed to customize your tab through the Insert menu
- Add the content to your outputs by adding it to Library Manager referencing DocContentSOW which is the Named Range.
- Push your changes to Production by going to Add-ins >> Help >> Updates >> Upload Updates
![]()
Customization Detailed Instructions
Anatomy of the Labor & Sow Tab
An Outline Tab – like the NEC and Mitel Labor & SOW tabs – uses DocContent Named Ranges as references to the content it will generate in an output. The Dynamic Content Creator (DCC) simplifies the process of setting up user-selectable (or auto-configured) content to push to Microsoft Word outputs. Instead of setting up separate doc sections in the document library for a paragraph, bullets or other content, the DCC functionality enables all content to be defined and driven from a single Named Range within the Excel tab. To view the cells that are included in the range, go to the Name Box to the left of the formula bar and select DocContentSOW.
Overview of Column and Row Functionality
- Columns A-C are left blank in the top section (see the DocContentSow range)
- Column D contains the subject matter for that row. This content is often directly referenced in Column G which appears in the output.
- Column E contains the cells into which the user enters data, either by choosing from a drop down field or entering a quantity.
- Column F is the “Include” column turns the content off/on. A zero in the column turns off the content in an output. A “1” turns the content on and will generate in an output. In the live quote, the “1” is replaced with a checkmark, indicating that it will be included. The cells contain formulas that decide if the text in Column G will appear or not in the output.
- Column G contains the text that will appear in the output. Some contain formulas that decide which text should display depending on the user choice in Column E.
- Example: =IF(E44=”Yes”,”Customer will be responsible for setting and testing user desk phones.”,”&FULFILLERSHORT& will be responsible for setting and testing all phones.”)
- Colum H contains the Content Type. The Content Type tells SDA how to display the content in the output (e.g., bullet, header, DocFile, etc.). If you use the Insert function while customizing the RAW Tab, then SDA will populate the Content Type for you.
- Columns J thru N determine the labor that is associated to that row. These cells also may contain formulas.
- The Labor Summary on the top right of the tab hold the totals for all of the labor from the rows below. The Total Hours are pushed to the appropriate labor line item below in the Part Detail section. Note that the Design labor is calculated based on a percentage of the total tech hours. All of these can be customized for your business by modifying the formulas.
- The Parts Detail section at the bottom of the tab contains the labor information consolidated from the Labor Summary section. This section can also contain equipment items such as frequently used parts.
Inserting Additional Rows of Data
When inserting additional rows of data, be sure to copy/paste rows instead of inserting a new blank row so that the formulas and formatting are included. Also be sure you are adding rows within the DocContentSOW Named Range.
Additional Automation
Additional automation can be added by using formulas to turn content on/off, auto-fill quantities, parts or labor as needed.
More Information
For more information on DCC functionality click here.
Add Content to the Outline
The outline is defined by the DocContentSOW Named Range. You can insert content to further customize the tab for your business.
You can add text content directly to the outline as paragraphs, bullets and headings. In addition, you can add references to external content that is dynamically inserted into the final output from:
- A Word, PDF or image file – Make sure the file is first saved to a shared location so that users will have access in a live SDA Quote. If the file is not in a shared location (e.g., SharePoint, Cloud-Stored SDA Files, or a network location), then users will not have access to the file when they generate the output.
- The Builder Library (if you have RFP Response Builder)
- The SalesDoc Architect Library
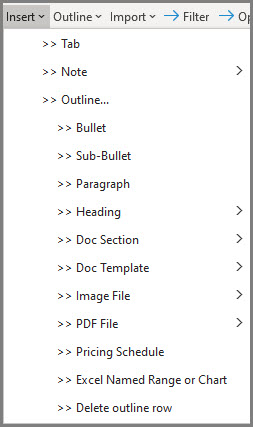
Figure 1: Insert Menu
Insert a Doc Section
- On the RAW Tab, click on the row in which you want to insert the Doc Section
- Go to Add-ins >> Insert >> Doc Section (see Figure 2)
- Choose the source for the Doc Section you want to enter into your Outline
- Browse: This allows you to browse for your Doc Section. Make sure the file is first saved to a shared location (e.g., network drive, SharePoint, AWS, etc.) so that users will have access to it from a live SDA Quote.
- Browse and copy to Quote location: This function is for live quotes only and not for working in RAW tabs. This allows users to browse for the Doc Section and also auto-saves the document to the quote file’s save location.
- Browse extracted Doc Section (if you have RFP Response Builder). This function is also for live quotes only and not for working in RAW tabs.
- From Builder Library (if you have RFP Response Builder)
- From SalesDoc Architect Library (see Figure 3):
- The Insert Doc Section window will open
- Type in a keyword and click the Search button or click the Search button to show all available Doc Sections (internal only)
- Double-click the Doc Section to add it to your Outline.
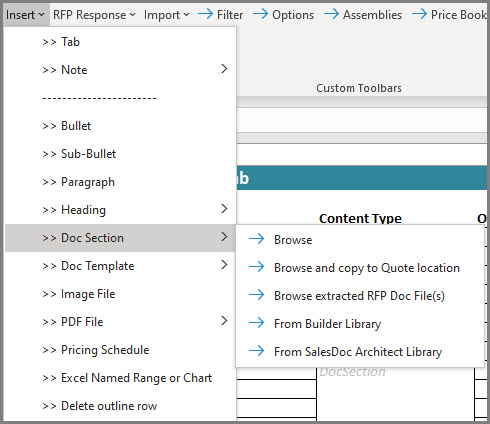
Figure 2: Doc Section Menu
Tip! You can add as much content as you want. In fact, you may want to include lots of different content and have your users turn each section on/off as needed per the Include column.
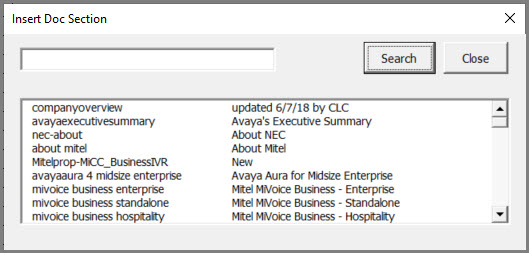
Figure 3: Insert Doc Section from SDA Library
Insert Excel Named Range or Chart
You can insert a Named Range or Chart from your SDA environment into your Outline. For example, you could insert an ROI table from another tab. The tab that contains the table or chart will need to appear in the Live Quote in order for the reference to work. So, if you have a leasing chart in a Finance Tab that is referenced by an outline on another tab, then the Finance Tab will need to be inserted into the live Quote File so that it can be found.
- On the RAW Tab, click on the row in which you want to insert the range or chart reference
- Go to Add-ins >> Insert >> Excel Named Range or Chart
- The Insert Excel Named Range or Chart dialog will open
- Select the type of range or chart you want to insert
- Select the name of the range, table, or chart
- You can also type in the name. This needs to be the name of the range, table or chart exactly as it is named in the other tab.
- Click OK
- A reference to the range or chart will be added to your outline
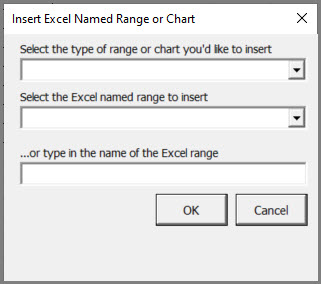
Figure 4: Insert Excel Named Range or Chart
Insert a PDF
You can add PDFs to your outline. A good use for this is if you want to add product brochures.
- On the RAW Tab, click on the row where you want to insert the content
- Go to Add-ins >> Insert >> PDF File
- Choose either:
- Browse: browse for the PDF you want to add. Make sure the file is first saved to a shared location so that users will have access in a live SDA Quote.
- Browse and copy to Quote location: this function is for live quotes only and not for working in RAW tabs. Since you are setting up a Tab as an Admin and you are not saving the Quote File to a shared location, this option will not work in a RAW tab.
- Select the PDF file and a reference to it will be added to your Outline.
Add a Bullet, Sub-Bullet, Paragraph or Heading to the Outline
You can add bullets, sub-bullets, paragraphs and headings to your Outline. These items will be inserted into the output Word document using the style of the Doc template.
- In the RAW Tab, click on the row where you want to insert the bullet, sub-bullet, paragraph or heading
- Go to Add-ins >> Insert
- Choose either:
- Bullet
- Sub-Bullet
- Paragraph
- Heading: choose the type of heading you’d like to insert.
- Enter the text you want displayed as the bullet, sub-bullet, paragraph or heading in the Content column.
Example: In the example below, we have inserted a Heading 2 into the outline. Then we entered the text we wanted for the heading which was “Set Types:”. Note that SDA automatically added “Heading2” as the Content Type, which tells SDA how the content should appear in the output (e.g., paragraph, bullet, header, etc.).
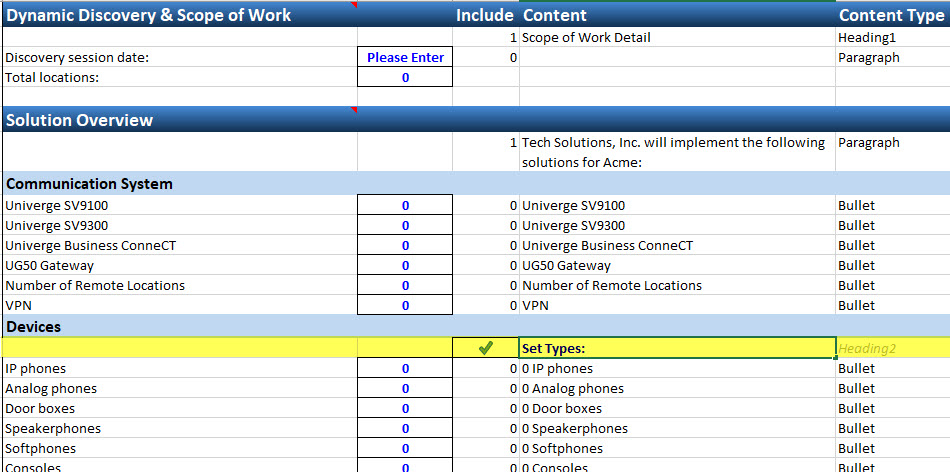
Figure 5: Example of Inserting a Heading
Delete a Row
You can delete a row from your outline. This menu option can be used when customizing the Raw tab or in a live Quote File.
- In the Tab, click on the row that you want to delete from the Outline
- Go to Add-ins >> Insert >> Delete Outline Row
Note: This action cannot be undone.
Adding Notes
You can add notes to the Outline in the “Notes” column.
- On the RAW Tab, go to the row in the Notes column (within the Outline) into which you want to add text.
- Type in the text you want to add
- Notice that the formatting is automatically set to the style “Input” meaning the cell is unprotected and users can type in the field.
Adding the Content to Library Manager
You can specify where the content contained within the DocContentSOW named range of the tab should appear in a larger output document containing several doc sections by adding an “external” Doc Section reference in your Library Manager.
- In Architect Manager, go to Documents >> Library Manager
- Click on the row where you want DocContentSOW to appear in your outputs relative to the other doc sections in the library.
- Click Add
- Choose External to library (Excel Range)
- Under Section Name type DocContentSOW
- Choose the appropriate Doc Section Type (most likely you will want to use “Proposal+SOW”)
- Add a description if desired
Providing User Access to the Tab
Now that you have built your customized tab, you need to decide how users should access the new Tab. They can manually insert the tab into any quote file via Insert >> Tab, or you can set up a new Quote Template that opens up a new quote file with the new tab already inserted. For further information, please see How to set up a Quote Template.
Test in a Live Quote
Now that you’ve set up and customized your Manufacturer Labor & SOW tab, you need to test it in a live quote. Make sure to generate the proposal so that the flow and appearance are the way you want it.
In the live quote, notice how the check marks appear for all items that will be generated.
Make New Tab Available to Users
Now you’re ready to distribute the new tab that you’ve customized to your users. Simply click (on the SDA menu bar) Add-ins >> Help >> Updates >> Upload Updates. When prompted, select the files you want to push out to your users, holding the Control key to select multiple files. For more information, please refer to the Cloud-Hosted User Updates help topic.
More Information
- View the Discovery-Driven All-At-Once Automation workshop
- Read more information on Dynamic Content Creator functionality
- Learn more about Pushing updates to your users
- Read more about How to set up a Quote Template