Customizing Your View
Sort/Add/Delete/Edit Columns
Sorting a Column:
To sort a column, click the column header. To sort multiple columns, hold your Control key as you sort each column in succession.
To move a column:
- Hover over the column heading you want to move
- Click and drag the column heading to the desired location
- Release the mouse when you have repositioned it
- Don’t forget to save your View if desired
To add or delete a column:
- Click the Columns Menu to the left of the View
- The Columns View will open
- Check the box to the left of the column name to see the column. Uncheck the box to remove that column from your View.
- To collapse the Column View, click the Column Menu again

The Columns Menu
Change the column width:
- Hover your mouse on the line between columns until you get the left/right arrow.
- Drag the arrow left or right to resize the column
Reset the column width:
- Go to column heading and choose the menu icon
- Choose one of the following depending on desired outcome:
- Autosize This column to reset the column width of that column
- Autosize All columns to reset the column width of all columns
- Reset columns to reset all column adjustments
Column Heading Menu Icon
To Pin a column:
- Go to column heading and choose the menu icon
- Choose Pin Column
- Choose position: Left, Right, or No Pin; this will keep the column fixed to either the right or the left of your View.
- Choose “No Pin” to unpin a column
Using Column Filters
To quickly filter a text column, enter text into the box just below the column name, then press Enter. To access more advanced filtering:
- Go to column heading and choose the menu icon
- Click the drop-down in the Contains field and choose one of the following depending on desired outcome:
- Contains (default)
- Not contains
- Equals
- Not equal
- Starts with
- Ends with
- Enter text/data in the Filter field
- Note: not all columns allow filters
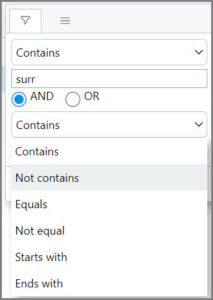
Column Filter Options
Filtering by Close Date/Sales Type
You can filter the data in your View by:
- Click the Close Date/Stage Type button in the top left of your window
- Check the boxes for the data you want to see in your View
- Enter a date range if desired
- Click Apply
- Click the Close Date/Stage Type button to collapse the window
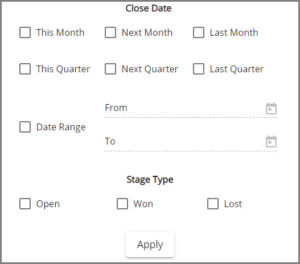
Close Date/Sales Type Window
Show/Hide Sibling Data
Depending on your organization’s Dashboard setup, you may see data from “siblings” in your company’s Company Role hierarchy. If so, you will see a “Show Sibling Data” checkbox at the top of the view. To see or not see sibling data, other people’s Opportunities. To turn this off uncheck the “Show Sibling Data” at the top of the view (for more information, see Sibling Data).
Go back to User Guide for SDA Dashboard